
Last Update: May 25, 2021

Maybe you have heard the spreading rumors that Windows 10 is collecting too much private data and information from its users. If you are one of those users who is concerned about the privacy settings of your information while it is kept online, there are good solutions that you can use to free yourself from this trouble.
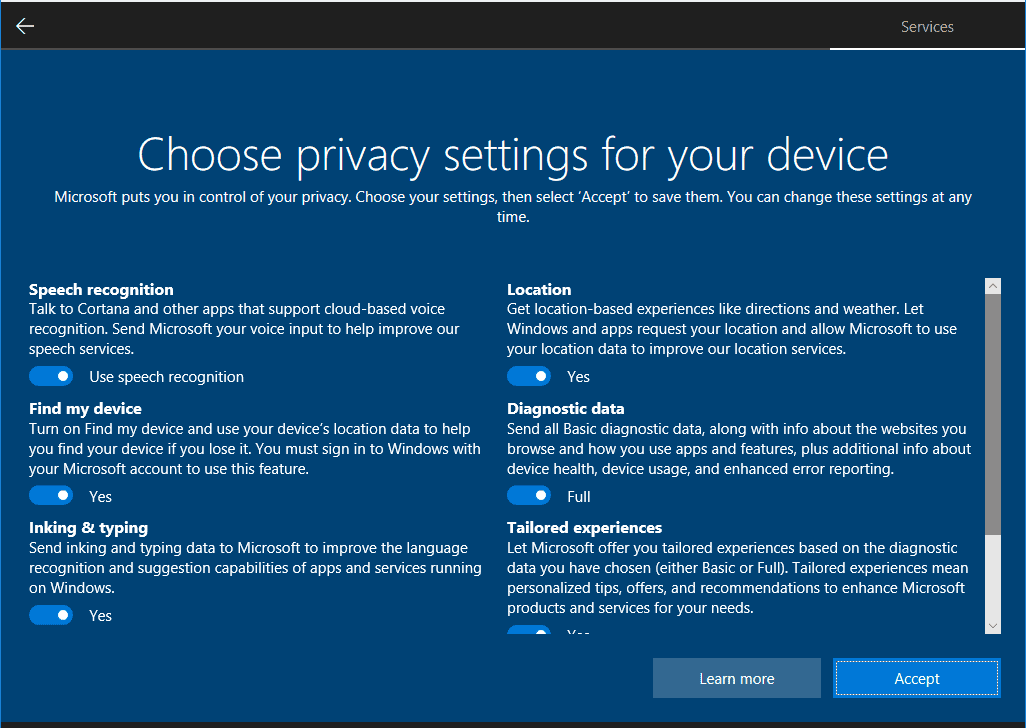
This privacy settings guide will help you protect your privacy in so many ways. They are not complicated and will only require some mouse clicks with your Windows 10 privacy settings.
Turn off your location
Switching off your location is one of the solutions on how to secure Windows 10 privacy settings. Many users are not aware of this idea and most of the time, they consider this one as a harmless setting. But that is not what the settings privacy guide is telling you. To turn off location, start with opening your settings app, search for Privacy settings, and click Location.
When you search the “Allow access to location on this device,” you need to click the Change button and it will display a slider from On to Off. When you turn off location, it can prevent the tracking of your location using your PC or other devices.
Switch off Ad Tracking
The best anonymous VPN providers recommend that you should turn off your Windows 10 ad tracking since your information can be accessed easily while you are browsing the web. To gather your information about you, Windows 10 is using an advertising ID.
To switch off your ad tracking, go to your Settings, then search for Privacy settings, and click General. From there, you can see your choices under ‘Change privacy options’ and the advertising ID. Moving the slider for On to Off will complete the process. Next time you browse the web, you will continue seeing ads but your browsing activity is now safe.
Switch off Your Timeline
Timeline is one of the features that you need to switch off to protect your privacy settings. With your Timeline, Windows 10 can gather information about your activities which can jeopardize your settings privacy. Switching off your Timeline is simple.
Access your Settings, then go to Privacy settings, Activity History, and unclick all the boxes that you can see next to ‘Send my activity history to Microsoft,’ and ‘Store my activity history on this device.’ This feature can also be switched off using the settings Privacy Dashboard of your account info with Microsoft.
Cortana is the digital assistant of Microsoft and it knows everything about you with the help of your computer. But you can limit Cortana’s collected information in some ways. The first thing that you need to do is to open your Cortana settings, access the search box, and click the icon that is representing Cortana settings. After doing these steps, a window will show up and you need to choose ‘Permissions and History’ for your Cortana settings. Now, you can go to ‘Manage the information Cortana can access from this device.’ In this part, you can switch off the ‘Location’ so Cortana will not track and store the information of your location.

Now that you know about Cortana and how this digital assistant works, let’s move on to the next part that is as important as Cortana.
If you are using your Microsoft account on multiple devices, all your settings will be synced on them. This means that whatever changes you have made with your desktop will be applied to your laptop if you will log in to it using the same Microsoft account info that you used with your desktop.
However, some users don’t want to keep information on their Microsoft account. If you have the same case, you need to avoid using your Microsoft account to all your devices and use a local account instead. To do this one, simply go to your Settings, then Accounts, and you need to choose the ‘Sign in with a local account instead.’ As soon as you are done with these steps, you will not be allowed to use OneDrive storage, Microsoft’s download and install or other services that are related to it.
Without any idea from the users, the Windows 10 settings app has the power to invade their privacy settings. This settings app can get full access to your camera, contacts, microphone, location, photos, videos, and many more. The good thing is you can avoid this from happening if you want to. All you need to do is go to the Windows 10 Settings and choose Apps. Now that you are looking under settings App and Features, you will see all the installed and running apps on your device.
Now, you can choose the settings app that you wish to modify its permissions and click the Advanced Options. To set your desired permissions, toggle the on and off button respectively.
With the use of Point-to-Point Tunneling Protocol or PPTP, Windows can function as a VPN server. But this feature may be hidden from many users and you can search and set it up using this guide.
Setting up your VPN apps has multiple uses. This is very useful when you are playing LAN games with other people, getting connected to your home network, or securing your online activities as you use a public internet connection. These are just some of the good reasons why you may want to utilize VPN apps. But this trick can only work with Windows 7, Windows 8, and Windows 10.
Some Windows 10 users may see this feature interesting, but this kind of setup for VPN apps may not be an excellent choice for you since it can give you many limitations such as:
To create a VPN server, here are the steps that you need.

Setting up a port forwarding is needed if you want to be connected to your new VPN server while using the Internet. Doing this will allow your router to forward traffic of that type to the right devices. With the help of the setup guide of your router, you can do this process with your own hands. Make sure that you are getting the right instructions before you take the first step.
To establish maximum security for your connection, creating a port forwarding rule will be a big help. This will send a random “external port” like 23343 to the “internal port” on your computer. With this, you will be allowed to connect to the VPN server with the use of port 23243 and you can be protected from any malicious access or programs that are attempting to connect to the VPN servers that are running using the default port.
You may also set incoming connections from specific IP addresses by using a router or firewall.
The process of setting up top VPN software for Windows 10 using a built-in VPN client is very easy. The entire process will depend on the kind of protocol available. When you want to create a VPN connection using an IKEv2 protocol, you need to download the protocol’s certificate and install it on your computer.
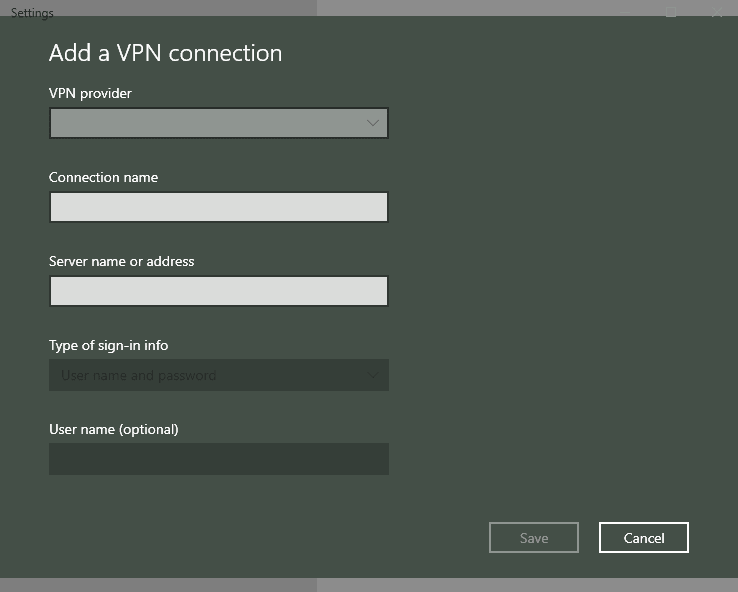
Once you are done installing, search the VPN using the computer taskbar. If you want to use the menu, you should search for your VPN. Now that you found your VPN, it’s time to click the ‘Add VPN connection’ and you are ready to access and explore the web without worrying about your settings privacy for Windows 10.
Windows 10 is the latest version of Microsoft venerable operating system. This is part of the Windows NT family of operating systems. It was released last July 29, 2015, succeeding the Windows 8.1.
Though many users can say that Windows 10 is safer and more secure compared to its previous versions, the operating system continues to be a hot target for every hacker and crook who wants to see and steal the user’s important data, both personal and business-related. There are a few reasons why Windows 10 users are attractive targets. One of the top reasons is because Windows 10 devices are commonly connected to unprotected Wi-Fi hotspots from hotels, coffee shops, and other public areas. When users carelessly use this kind of connection while they are on the road, they can highly become victimes of fraud, phishing attempts, and hackers.
With the help of VPN or Virtual Private Network, users of the Microsoft operating system can protect their internet connection and data from malicious acts and access such as prying eyes. They can save themselves and keep their personal and business information such as credit card and banking info privately.
When you want to access or use a VPN connection, you are being provided with an encrypted tunnel that is responsible for wrapping a layer of protection with your internet connection. Outside parties like hackers, government agencies, and your Internet Service Provider or ISP will be restricted to access and monitoring your online activities.
Another good thing about using VPN is it can make you appear like you are working from another part of the world, whether it is a few miles away from your real location or farther. With this feature, you will have the chance to access websites’ pages and services that are blocked from your local area, including gaming services, streaming sites, and other types of content or services that you want.
Here are the top 5 VPN service providers that are known to perform best with Windows 10. You might consider their services for your privacy settings goals.


Some Windows users are using free VPN apps for their devices. Yes, this option can save you some bucks. But have you ever thought about the risk of doing it? While you are using a free VPN, the providers behind this free offer may have been doing their work and gathering your information around. This information will be compiled and ready to be offered to an interested company with the highest bid. Free VPNs are attractive, but they may not be doing the thing that they are supposed to do.
When a VPN provider is not asking you with any fees for using their services, they may be doing other ways to earn money from you. Most free VPN providers make money by doing a record of your online travels and this information will be sold to advertisers or other interested parties.
If you are lucky enough, you may find a free VPN that would require you to wait before you can get connected to one of their servers. There are also cases when you get connected, you will be assigned to a specific server and you will never have the chance to choose on your own.
Remember, VPNs must free you from these restrictions.
People have different reasons when it comes to connecting to a VPN while using their Windows device. With VPN apps, you can secure your online activities and protect your privacy settings from various threats.
Before connecting to a VPN, you need to secure a VPN profile on your desktop or laptop. You may choose between creating your VPN profile or setting up a work account so you can acquire a company’s VPN profile.
For those who don’t have an existing VPN profile on your Windows 10 device, you need to make one. Here is the right process of creating a VPN profile.
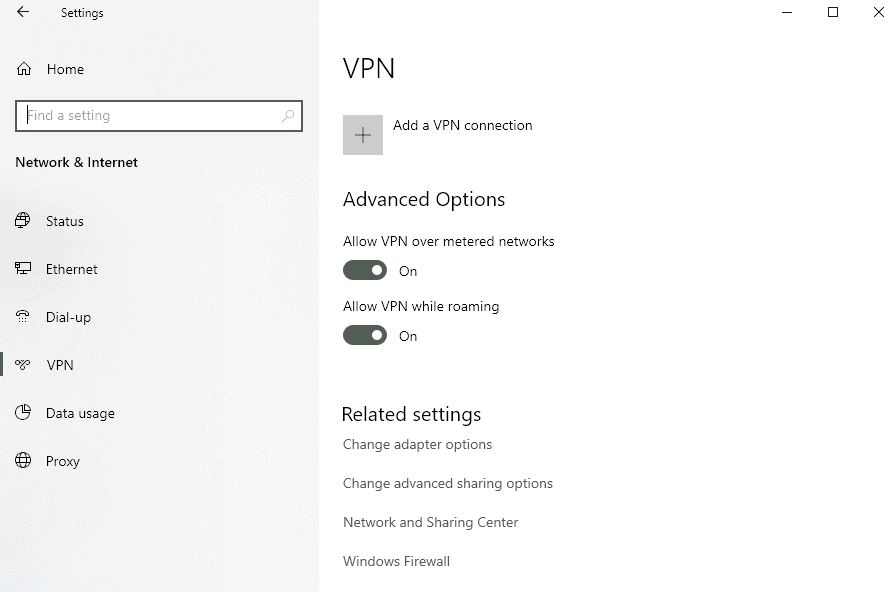
Click the Start button and go to the settings, then Network & Internet > VPN > Add a VPN connection. Under the VPN connection, you need to do these steps:
While technology is making our lives easier each day, it continues to give us pain as well. If you want to keep your safety and privacy settings while going online, you need to secure your Windows 10 privacy settings. We cannot ask everyone to behave the way we wanted them. That’s why we need to be ready with all the possibilities. Know the rules and play the game well.
