Last Update: August 26, 2020
DNS is an acronym for Dynamic Name System. It is responsible for the conversion that occurs from the initial domain names changed into IP addresses with their numerical or digit forms. The ISP (stands for Internet Service Provider) is the one that is responsible for this conversion.
Its normal route would include connecting to any VPN (stands for Virtual Private Network) service through DNS servers over DNS servers. These DNS servers are the ones that are considered as internet providers. No matter what the circumstance is, the ISP is unable to view the websites or the domain names that you have been viewing recently.
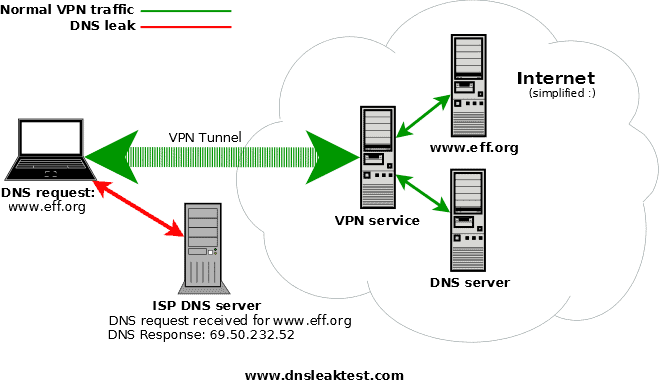
For some unknown reason, a DNS leak occurs when the ISP has the ability to view all the websites that you have visited. It mostly happens to those whose operating system is Windows. There is a high probability that the operating system has gone back to its default settings. By doing this, it returns these ISPs back to the DNS servers when in fact, under normal circumstances, they should pass through the one and only VPN tunnel.
Because of this DNS leak, it has now become a source of immediate danger especially when it comes to personal privacy. Other users may now have access to such personal information. This is bad news for the user because s/he does not know that the private information that s/he is accessing can be viewed by other people.
If somehow by any chance, this private information lands into the wrong hands especially with people who have bad motives, then one can expect for the worse. These cybercriminals are known as hackers who can use a DNS leak to their advantage by getting hold of private information like bank records and using it to access these private records only known to the user.
The risk of a DNS leak is a very serious one because the online security of any computer user is threatened. What is believed to be a safe zone for viewing personal information can become a danger. If someone is able to access these private records, one might have trouble tracing back to the person who has done it.


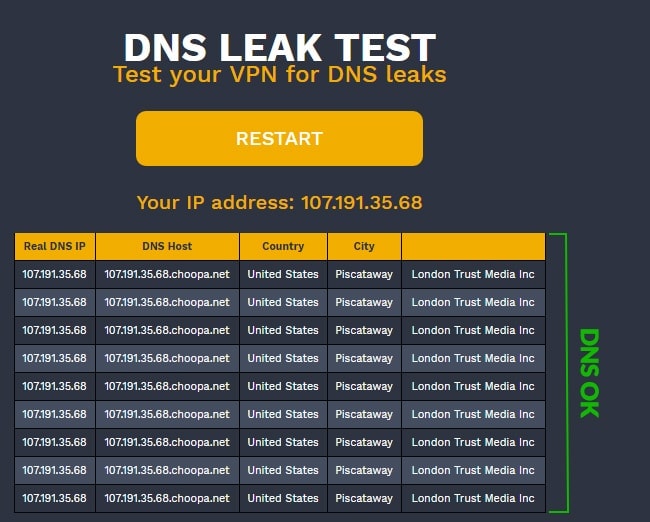
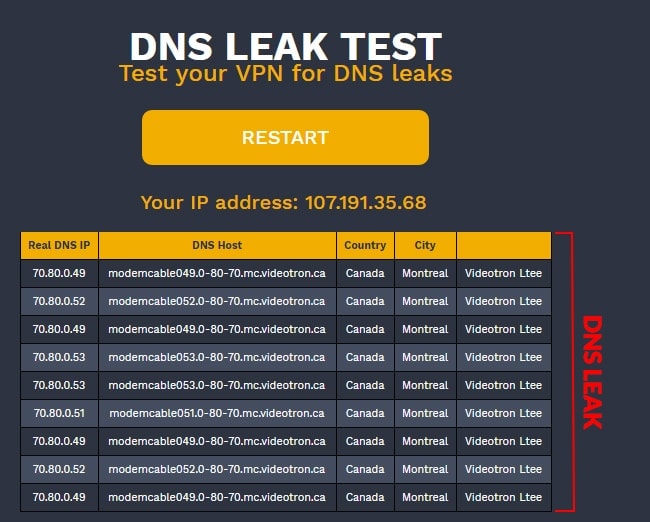
If you think a DNS leak has occurred in your operating system, you can go to https://hidester.com/dns-leak-test/ and conduct the DNS leak test. You will be able to check if a DNS leak has occurred within your computer’s operating system based on the results.
Once these results have come out, be sure that you are able to identify the IP numbers that have been displayed. If by chance, these results point out the user’s true position by revealing the country or if there is a match to your ISP, this means that your operating system is currently experiencing a DNS leak.
If you were able to conduct the DNS leak test and found that there’s a chance that a DNS leak has occurred in your operating system, there are several ways to fix DNS leak. Before anyone goes ahead to fix DNS leak, make sure that the user is well aware of the anonymity service by utilizing its one and only DNS server. In some cases, there could be more than one DNS server.
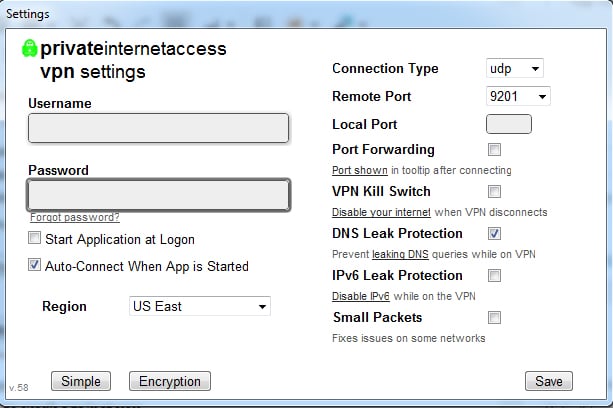
The simplest method to fix DNS leak is to open the settings on your computer to access a VPN client that possesses a DNS leak protection. However, not all VPN providers are able to offer this kind of option. Those who are lucky to experience it should do some of these alterations. For Private Internet Access (PIA), it can be found in Settings and check DNS Leak Protection. With TorGuard, click on Automatic.
Another option would be to edit the network card with the DNS of the VPN provider. By modifying DNS servers from time to time, you don’t give a chance for the ISP to work against you.
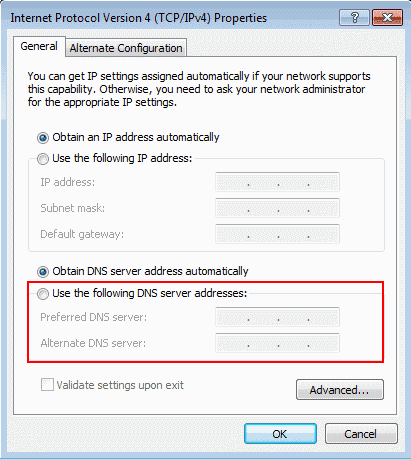
Click on “Start” and go to “Control Panel”. From there, click on “Network and Internet”. Click on “Network and Sharing Center”. Click on “Change adapter settings”. On the main source of your Internet connection, right-click then select “Properties”.
Find the list under “Networking” and select “Internet Protocol Version 4 (TCP/IPv4)”. After highlighting that, go ahead and click on “Properties”. The current DNS server address should be written down somewhere so that you can return to its settings in the future. After it has been done, click on “Obtain an IP address automatically” Once it has been completed, click “OK” to save changes. Restart the connection for the changes to take effect.
Then you are done!