
Last Update: February 28, 2022

VPN or Virtual Private Network affords a level of privacy and security that anyone needs to prevent any third party from spying on their online activities. This kind of security and privacy is possible since the VPN server provides the private route from which one can enable access to the public server. This guide will teach you how to setup VPN on Windows 10 easily.
Whether you live in a remote place or not, you must consider using VPN each time to enhance your level of security as you browse online. However, if you are residing anywhere remote, finding the right ISP you can depend on, will help you do all the job without any hassle or stress on your part.
What is good about premier VPN memberships is that they come with a VPN for Windows 10 app that enables to add a VPN connection and configure is as easy as 1-2-3. All you have to do is find that big button that says ‘Connect.’ This is possible with any Canadian VPN client too.
When you are using VPN sans the client, you may still configure your VPN manually if you know the server name or address, or the network to connect to. You will also need the connection name provided by the network or VPN connection. If you have bought a subscription to any VPN service and you wish to have it set up manually, we have here outlined everything you want to know.
Although most users don’t know what is VPN in Windows 10, making a VPN conneciton is relatively easy. Upon setting up your VPN in Windows, you can make use of any software provided by your VPN service provider. Or, you can use other software that your 3rd party VPN provider offers or use Microsoft’s VPN client. It must be noted that the software client provided by the VPN service can provide the highest level of flexibility. The builtin Microsoft client is ideal for use by VPN protocol that may not be supported by the VPN service.

Let us go through the steps of setting up a VPN in Windows 10 with a built-in VPN client. The whole process will have to depend on the protocol being used. To create a VPN connection in an IKEv2 protocol, one should download the certificate and install it initially on your computer.
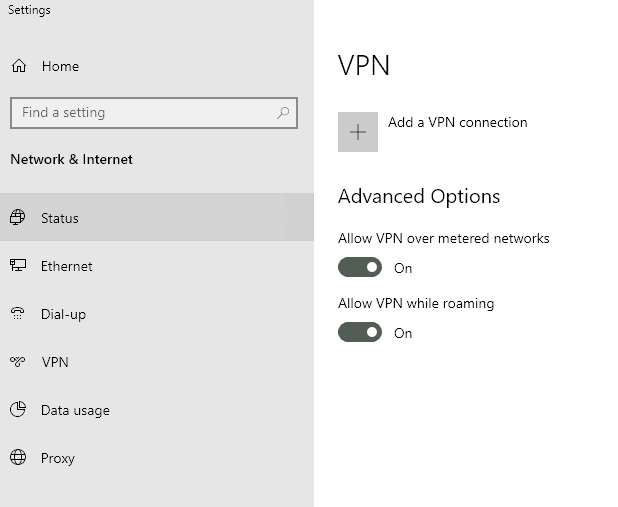
Once you have it installed, you can search for the VPN in your computer taskbar or from the menu, search for your VPN. The moment you can locate the VPN, proceed to click on the ‘Add VPN connection.’
From the steps mentioned above, the window that will open next will require you to enter your VPN details. These details will be necessary for you to create a VPN connection. It will include your connection name and the server name.
The server and connection names will be given to you by your VPN service provider. You will then be required to select a VPN provider at this point from the dropdown menu list. Then, select Windows built-in. Once you make the selection, VPN will be set to ‘Automatic.’ Next, the kind of sign-in info will be your – Username and Password.
Right after you made the entries provided above, a space for your username and password for the VPN service will appear. You will be prompted to input the password and username that your VPN provider has given you.
You should input it in the fields provided. When your sign-in info is correctly added, the settings will then be saved. Once you have saved the settings, you can now exit the settings app.
When you close the settings app, the fastest VPN service will prompt you to go to the taskbar, where you can click on the Wi-Fi icon found there. Upon clicking this Wi-Fi connection icon, the VPN connectivity that has been set up previously will be found on top of your connection options.
Then, you have to click on the VPN network, and your computer will connect to the cheap VPN server if you followed the steps that were outlined above. When the connection is not made, you can once again go through the steps mentioned above once more and ensure you do not miss any one of them.
Take note that these steps are intended for setting up a VPN with Microsoft’s built-in VPN client in Windows 10. The steps can vary with custom software or a third party software client for that matter. Also, one should have an active VPN subscription to be able for the entire setup to work and function seamlessly on your computer.
When you have subscribed to a reputable VPN service, you have to bear in mind that you have many options you can find online where you have access to a list of servers that you can conveniently connect to like an anonymous VPN server for instance.
In the case of premium VPN service, which is often the ideal VPN connection, their CP or Control Panel page will give you a list of the server’s possible location. And the exact addresses you will need to establish your manual connection, as well as the present load of that particular server.
You must likewise determine what protocol you may use to connect. If you are not using Windows 10 in ‘S’ mode and can download files from other locations, you can download a premium VPN configuration. If this does not work, try to go to the most secure protocol possible. In many cases, you should do away with the PPTP.
If you have the right information to make your VPN connection, you can go strategy to the settings, configure, and get everything working. When you have all the necessary information in place, you can go ahead and go straight to the settings and make sure everything is working smoothly. Here are the steps to get started:
Yes, your Windows 10 does come with a built-in and integrated VPN client. The VPN affords a distinct level of privacy and security, which one needs to prevent a third party from spying on their network activities. This kind of privacy and level of security, if possible since a VPN server provides a private route with a secure IP address from which one can reach the public server.
The Windows 10 home software is best for many people, as it brings a lot of features to your computer. Users have the Windows Hello security, access to Windows Ink app, Cortana – personal assistant, and a host of integrating gaming suite and apps.
Not to mention regular updates that help to keep everything working seamlessly for the users. When you know how to setup a VPN on Windows 10, you get the best of both worlds.
A VPN setup on Windows 10 adds another layer of security akin to having your own private network. It masks your public IP address and encrypts the data you send over the internet or the network.
