
Last Update: March 1, 2022
Contrary to popular belief, an invulnerable Mac is a misnomer and a myth debunked years ago. Adware, scareware, cryptominers, and even ransomware are increasingly targeting this ecosystem and there is plenty of room for improvement in terms of the defenses. To its credit, though, macOS comes with a decent set of security and privacy features available off the shelf.
The scourge of the modern digital world is that few users ever bother looking beyond the default settings to make the most of the protection mechanisms built into their devices. This lack of vigilance keeps the bar unacceptably low for cybercriminals who are growingly adept at exploiting systems, especially poorly secured ones.
This article provides a summary of the methods to take the protection of a Mac computer to the next level by fine-tuning its security preferences. Combined with a healthy dose of prudence on the user’s end, these techniques can stop malware attacks in their tracks while thwarting unauthorized access to the machine.
First things first, underestimating the security fundamentals such as proper password hygiene is a slippery slope. To make sure your data is off limits for remote crooks and individuals who may try to access it physically, specify a strong admin password.
When you first turn on a brand new machine, the system requires you to enter that secret combo of characters and numbers. However, this measure is only effective as long as the password is hard to guess and as random-looking as possible. If it’s “123456”, “password123” or similar, then your digital life is low-hanging fruit and you have to do something about it immediately.
The good news is, changing the admin password on your Mac is a no-brainer. Here’s the walkthrough:
Pro Tip: If you are having issues creating a strong password, consider clicking on the key icon next to the “New Password” area so that the system generates one for you.
If you own one of the newer MacBook models equipped with a Touch ID scanner, you might want to further strengthen your authentication practices. Here’s the lowdown on how to configure the Touch ID feature in addition to your account password:
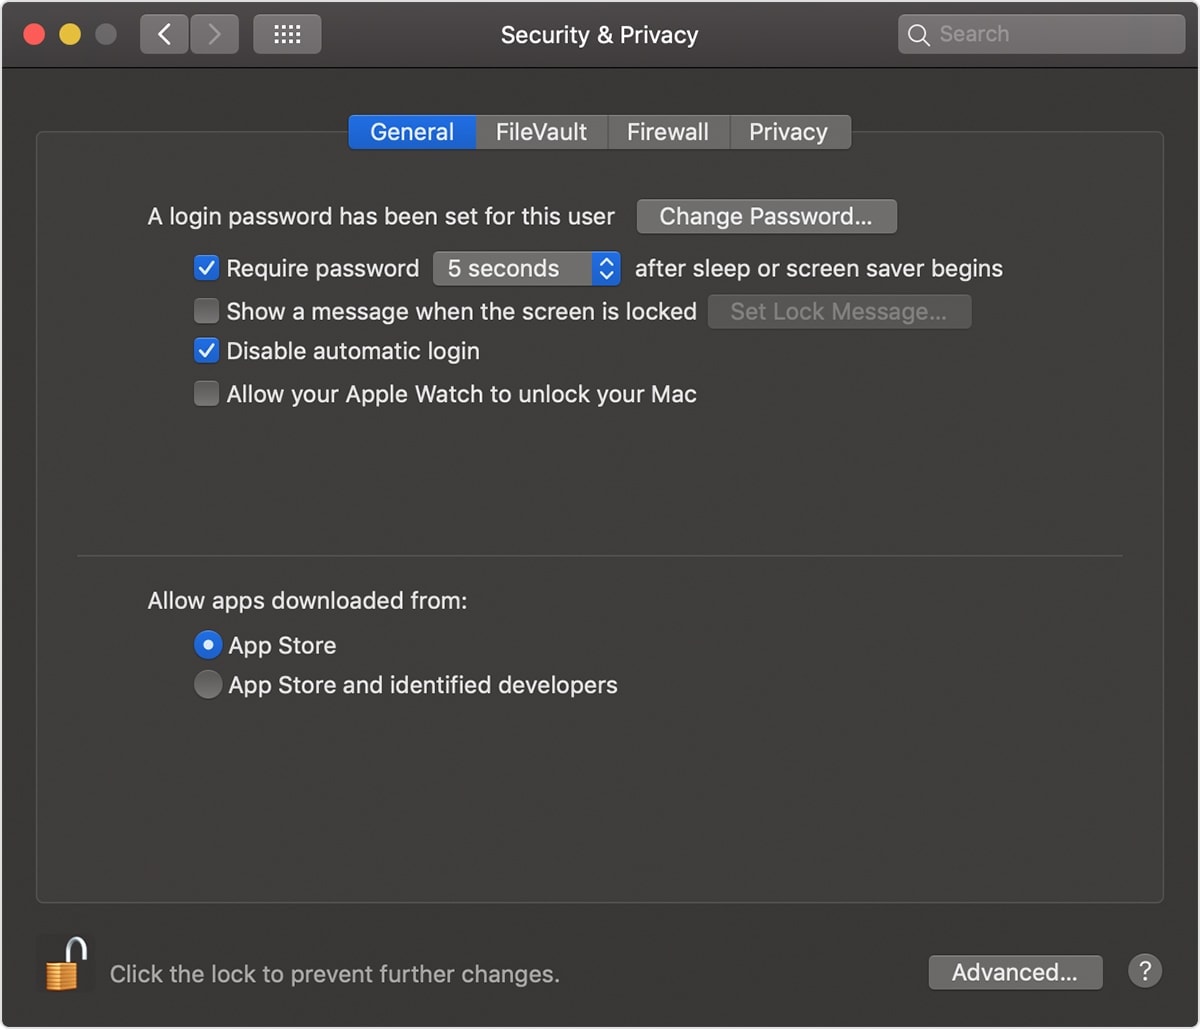
Whereas a password and a Touch ID create an essential layer of defense against unauthorized access, there are scenarios when you walk away from your Mac for a while and leave it unlocked. This situation is a godsend for snoops. To avoid it, you can configure the system to log you out after a certain period of inactivity or to require a password to wake it from sleep.
Here is how to instruct your Mac to log you out of your account after being idle for a particular amount of time:
Use the following steps to configure your computer to require a password after falling asleep:
In case you didn’t know, Macs have a built-in feature that automatically encrypts data on your disk. It’s called FileVault. Even if someone accesses your machine, they won’t be able to read or copy the cryptographically secured data. The admin is the only person who can grant this access to individual user accounts enrolled on the Mac.
Here’s what you should do to benefit from this functionality to the fullest:
This technique thwarts all forms of eavesdropping on the Internet. A reliable VPN for Mac encrypts your web traffic and makes it impossible to attribute your online activities to you. With a plethora of these solutions available on the market, it may be hard to pick the one that suits you the most. As a general rule, go for a service that follows a no-logs policy, keeps the connection speeds high, and provides a competitive range of servers around the world to choose from. If selected wisely, VPN is your privacy stronghold that keeps online snoops at bay.
The firewall feature that comes with your Mac is an effective anti-hacking mechanism many users neglect to enable. Don’t be one of those users. The firewall automatically fends off dubious incoming traffic, including connections initiated by double-dealing applications you may have installed. Follow these simple steps to enable the native Mac firewall:
Although the essential security preferences are at every Mac user’s fingertips, they are often ignored and malicious actors can piggyback on this negligence. These settings are amazingly easy to toggle and they can become a true game-changer in terms of both security and privacy.
If you add an effective VPN service to the mix, the combo becomes a rock-solid layer of protection minimizing the risk of hacker intrusions and malware attacks down the line.
